|


|
by Marco Scheloske
Scale: 1/700
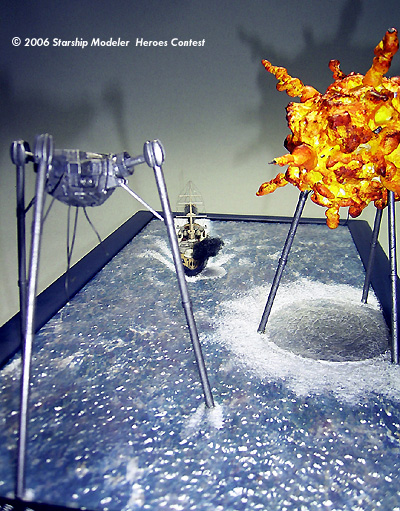
“The steamer began to move slowly away - but on the landward horizon appeared the silhouette of a Fighting Machine. Another came, and another, striding over hills and trees, plunging far out to sea and blocking the exit of the steamer. Between them lay the silent, grey Ironclad THUNDER CHILD. Slowly it moved towards shore; then, with a deafening roar and whoosh of spray, it swung about and drove at full speed towards the waiting Martians...
...
Moving swiftly through the waters
Cannons blazing as she came
Brought a mighty metal War-Lord
Crashing down in sheets of flame
Sensing victory was nearing
Thinking fortune must have smiled
People started cheering:
Come on THUNDER CHILD!”
What makes a real hero? Well, one point is for sure to stand firm when others run away in fear, another to fight for those who can't fight for themselves. The brave ironclad THUNDER CHILD and her courageous crew matched those respects perfectly: Instead of trying to make it on their own they decided to fight against an invincible enemy to secure the escape of the steamer packed with fugitives!
That scene of the musical version of “The War of the Worlds” gives me the creeps each time I hear it, and so I simply had to build a model of that glorious moment I see with my mind's eye to share it with you...
This diorama in 1:700 scale contains a lot of firsts for me - the first time I build a model based on a musical instead of a movie or book, the first time I used expanding foam to create an explosion “frozen in time”, the first time I build a resin model of a real ship and the first time I used photoetched detail parts.
Let me tell some words of how I did this and that, I try to not break the scope of this description...
First, the intact martian tripod, which is heavily inspired by the Jeff Wayne Version, but not a copy of that one, more my personal variant - a bit more tank-like, more massive: The main body is a Kotobukya ED-209 trading miniature (you already figured this out, didn't you?), turned upside down. To the small flaps that became the structure on its top I added a bunch of details from my spare parts box, mainly detail parts from tanks and mechs including some vents for the “black smoke”-weapon.
The legs are made out of wood, I wanted to give them a bit structure to let them look extraterrestrial. The connections from the legs to the main body were made from strip styrene, the two rings on each leg were made from self adhesive metal foil wrapped around them several times. The tripod was painted Bolt Gun Metal (“walking engines of glittering metal“), followed by a dark grey oil color wash and a drybrushing with bright silver to bring out the details.
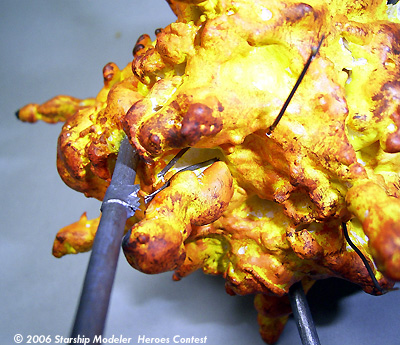
Second, the explosion: It was more difficult to "sculpt" this than I thought at the beginning - my first tries looked good at their start, but fully cured they just looked like crazy balls, not like an expanding cloud. This one has a core from styrofoam with wooden sticks attached to it. I used less foam than on my first tries, and when an area becomes to smooth while curing I worked on it with a toothpick (this is the most important part: You must make sure that the surface will not become too smooth). The “arms” are toothpicks, too, covered with just a little bit of the foam. I did this after the main cloud was fully cured.
|
|
The paint job consists of three basecoat layers of bright white, sprayed out of a rattlecan. All other colors are from Citadel / Games Workshop in the following order:
- A full layer of “Bad Moon Yellow”. Some white spots where not covered, they simulate the real HOT spots of the explosion.
- A drybrushed layer with “sunburst yellow”.
- A drybrushed layer with “golden yellow”.
- A drybrushed layer, using a very stiff, flat-ended round brush of approx. 8 mm diameter with “Fiery orange”.
- A drybrushed layer, using the same brush as in 4, with “Blazing orange”.
- A last layer with drybrushed spots, using the same brush as in 4 and 5, with “Scorched Brown”.
The finished explosion was mounted onto three legs, build the same way as the ones from the intact fighting machine. The “starboard” leg is just being ripped off the main body, look close and you can see the broken connection of the stabilizers! Finally I put some greeblies into the expanding cloud to simulate debris of the destroyed “mighty metal warlord”.
Third, the H.M.S. THUNDER CHILD: This is mainly a 1:700 resin model of the H.M.S. DUNCAN, a british ironclad from the last years of the 19th century. I took a bit artistic liberty regarding her paint job, a link between the victorian livery in plain black and white (mainly) and the grey of today's warships. Why? Well, regarding the timeline the ship should be carrying the famous victorian livery, but the narrator in the musical says “Between them lay the silent, grey Ironclad...”. So my variant is a compromise between those extremes. Instead of black I used a very dark grey and instead of white I used camouflage grey. Funnels and masts were painted buff, the whole ship got a slight wash with dark grey oil color and an also slight drybrushing with pure white, just to bring out molded details, not to make it dirty. The anchor chains were made out of thin black thread, twisted and painted dark grey. The rails and the crew (yes, look close: There are cheering crewman!) are 1:700 photoetched details from “Eduard”. Both masts were scratchbuild from brass rod, the model parts for those were made from resin and much to flexible in my opinion, I was afraid that they won`t survive the rigging without being twisted or that summer temperatures would have a bad influence on them for sure. The aforesaid rigging, made from monofilament, doesn't follow a historic example - I never rigged a model ship before, so I just wanted to add some eyecandy. The smoke from the funnels and the firing forward battery was made from colored cotton wool, fixed with hairspray.
Last but not least, the base: The water is a clear film from “Faller” with holes cutted into it for the hull of the ship and the legs of the tripods, the effects (waves, shockwave-flatened areas under the pounding gun and the explosion) were done with “water effect jelly”. Some areas were drybrushed with pure white to simulate foam. The underground is a print, created by myself in Photoshop, with a green-brown base color for the water of the Thames. I carried some elements too far intentionally, taking artistic freedom, to enhance the appeal I want to achieve - a dramatic battle between David and Goliath with a lot of motion, mainly regarding the THUNDER CHILD which was “moving swiftly through the waters”. Therefore the water of the Thames may be too “stormy”, but with less waves and foam it simply looked to tranquil to me. The same applies for the shockwave effect of the exploding tripod, it may not look completely “real”, but cool... and hey, who knows which effects alien devices blasted to kingdom come will create? Besides from that the tripods may seem too large to the one or other viewer, but - in my imagination the martians always used different sized tripods, small “infantry” ones and larger “battletank” ones. And remember that this diorama is based on the musical version, and besides the cover art there are some other hints that the musical tripods are larger than the original novel tripods.
The nameplate I made contains an enhanced logo from the cover of the musical CD and the words from the verse that my model shows.
Finally everything came together to create a three-dimensional copy of the glorious picture I have in my mind everytime I listen to that special chapter of Jeff Wayne's musical version of “The War of the Worlds”, and now everyone can see it, and eventual feel it, not longer only I myself - “Sensing victory was nearing, thinking fortune must have smiled...Come on THUNDER CHILD!”
Image: Broken leg
Image: Overview, portside
Image: Starboard side
Image: Thunder child, port view
Image: Starboard
Image: Mighty Martian War-Lord
Image: From behind
Image: Doomed
Image: Another look
|
|
![[Heroes banner by Allison Cottreau]](HeroesBanner2.jpg)